87% off ends soon!
 How to start an online store: 7 steps to success
By Kaleigh Moore September 19, 2023
Starting an online store has never been so easy. That may be why there are 26 million of them out there. People around the world have taken modern digital platforms like Etsy and Amazon and turned them into businesses they can run from the comfort of their homes.
Yet even with all of the advantages possible in the digital age, building a digital store can get tricky.
Why? Building an online store can be overwhelming, especially if you don’t have a lot of experience.
For example, should you build your own website, or “rent” a platform like Amazon? Or both? And how should you build your customer list once the store’s up and running?
The further down the rabbit hole you go, the more questions there are.
Maybe you haven’t built a digital store before. If that’s the case, you’ll need a step-by-step guide to building an online store that works for all skill levels. Let’s explore what those steps are, and how to take them one at a time until you have a digital store you can be proud of:
Step 1: Choose your niche
Some people get it backward: they choose a platform before they choose a niche.
This can be problematic. For starters, what if you choose a niche that doesn’t perform well on that platform? What if your ideal customer doesn’t like that platform very much?
So we recommend starting with the niche. This is the most important decision you’ll face. Choose a niche rife with opportunities, and every stop on this list gets much easier.
Consider the example of Amazon. Though it would eventually become the so-called “Everything Store,” resources were limited back at its founding in 1994.
Amazon’s leadership had to choose which niche to start with. Music? Apparel?
CDs? Office supplies?
Books?
Amazon identified a hole in the market for buying books online. No other company had figured out how to make the Internet work for booksellers yet. Place an order for one online in 1994, and it might take you two weeks to receive it.
As soon as Amazon started selling, the challenge wasn’t finding customers. Their top challenge was managing all the orders they had.
They chose their first niche well.
If you choose yours well—a combination of built-in market demand and an underserved customer base—every other step on this list will be easier.
Identify niche trends
Here are some tools for identifying niche trends:
- Google Trends. Though Google Trends won’t lift niche suggestions for you, it will help you confirm which niches are growing in interest. And you can sometimes use the Trending Now feature to see what people are searching for. Just remember that these trends might have nothing to do with online shopping habits.
- Social media. Get on X or Instagram and run the numbers for a few niche ideas. Does the niche’s hashtag get a lot of traction? If you search for “bookmarks” vs. “beads,” which returns more results—and more enthusiastic results from users?
- Facebook ads. Browse through your Facebook feed and pay attention to the ads you see. If your niche overlaps with your interests, it shouldn’t take too long. Try to spot which ads are still hanging around after a few months. Those ads are probably making money.
- Online discussion websites. Try Quora or Reddit and see what people are saying about the niche. For instance, is the “subreddit” for your niche far smaller than the other niche you were considering? If so, that’s a clear indication of market interest.
Niche suggestions you can use
You can use today’s online selling platforms to identify a few niches that already sell, too. If you’re using Etsy, you’ll notice the following niches are popular:
- Crafts (beads, jewelry, handmade items)
- Home decor
- Stickers and magnets
- Mugs
- Prints
- Apparel
On Amazon, you’ll find some niches overlap:
- Apparel
- Health and nutrition
- Gifts
- Beauty products
- Grooming
- Pets
Have you settled on two or three niche options you want to sell? Use our niche identification tools above to check where the audience’s interest is.
Ideally, you’ll find a niche with two elements: 1) engages you creatively and 2) there’s pre-existing market demand.
Step 2: Choose your platform
Once you have your niche, you stand at a crossroads: where do you sell?
One platform? Many platforms? Should you start small and build up, or start big and fill in the details as you go?
Let’s break it down into two key decisions:
Web domain and hosting
No matter where you sell, it helps to plant your flag independently.
You can think of selling online like renting a vendor’s stall in a shopping mall. It’s great for foot traffic, but you won’t have as much control.
Meanwhile, setting up shop on your own domain is like building your own store. Getting foot traffic will be the challenge. But once it’s in, it’s yours.
If you’re not highly technical, your best bet is to choose an online hosting tool that lets you register your domain while offering great web-building features. This minimizes confusion, especially for newbies who have never registered a site.
Here are a few options to consider:
- Squarespace. An easy way to start online, with attractive templates and low-cost hosting.
- WordPress with the WooCommerce add-on. Especially great if you plan on adding to your website over time.
Online platforms vs. independent websites
Of course, you don’t technically need a website.
If you build on Etsy, for example, you can start selling immediately. There’s a built-in audience ready to click “buy” because of their trust in the platform. Ditto for Amazon and other platforms.
The problem? You’ll pay for it. Literally.
Etsy, for example, will charge you 6.5% for every transaction.
You’ll also have the problem of breaking through in a competitive market. Yes, platforms supply plenty of foot traffic. But other stores want that same traffic.
If you can master in-platform strategies like Etsy SEO, this can work in your favor. Look at some of the top performers in your niche. What’s working well for them?
Reverse engineer as much about them as you can, including:
- Product photos
- Product videos
- Headlines
- Keywords in your headlines
- Types of products you sell
- Product descriptions
Finally, don’t forget a brand identity. Whether you work on someone else’s platform or build your own website, memorability is key here.
Step 3: Product building and listing
You know what you’re going to sell (Step 1). You know where you’re going to sell it (Step 2). Once you’ve identified where you’ll plant your flag, the next step is simple: inventory.
Simply put, you need a way to build the products you plan to ship to the world.
Product sourcing options
If you’re an at-home crafter, maybe this one’s easy. You were always going to make your own products.
But don’t be afraid to slow down here. What happens if everything goes right, and your first order is for a thousand homemade necklaces?
Yikes. But also: yay! But also: yikes.
It’s worth briefly looking over the options you have to build the products you plan on selling:
- Make them: If you make your own products, you’ll have a lot of control over product quality, which suppliers you use, and the care that goes into them. But you also face a bottleneck here. Unless you can hire someone to help you, your production quantity can’t go higher than what you can personally produce.
- Dropship them: Dropshipping has the advantage of scale because you don’t have to be physically present. You’re essentially the intermediary between the buyer and the manufacturer. You send your orders to the drop shipper, and they handle the rest.
- Outsource them: You can always hire out production when you can’t handle it yourself. Your costs will go up, but the advantages are that you can scale your shop and retain quality control.
Product listing
Now you’ve got products. But customers don’t know that yet. They have yet to meet your products and get familiar with how great they are.
Enter product listing.
Whether you’re borrowing someone else’s platform or building your own, you’ll need to share these details with your customers, including:
- Detailed product descriptions. You don’t have to be an expert copywriter to create an enticing product description. You can plug some details into modern AI tools like ChatGPT and give your new description a quick edit.
- High-resolution images. The sharper your image, the better your product looks. A reported 75% of online shoppers rely on product photos when deciding on their potential purchase, after all. Videos work similarly well.
- Videos, whenever possible. Multiple images work best for product listings because they simulate the 3D experience. The same rule works for videos. Give customers a “demo” of the product as it works in real-time.
- Pricing and shipping information. Customers love free shipping. 80% of customers expect it after spending enough money. Raise your product prices if it helps you afford the shipping costs—but nothing helps you sell quite like a tag that says “free shipping.”
- Discounts/special deals. These aren’t 100% necessary all of the time. But if you’re launching a product for the first time and want to build brand recognition, you can spur new sales by creating exclusive offers.
Step 4: Collect customer emails
One key step to starting an online store is to set up a system where you can collect customer emails.
If you have a long list of new customer email addresses, it only builds over time. And if you have the addresses of your most loyal customers, you have somewhere to turn to whenever you want to send:
- Email notices of upcoming sales
- New product launches
- Follow-ups when customers abandon their carts
Signing up for AWeber, of course, is a step in the right direction. But even if you don’t sign up for AWeber, let’s talk about why collecting these emails can have a transformative effect on your business.
If you don’t collect emails, every customer order is just that: a quick transaction. And if you don’t sell subscriptions, you’ve lost that customer.
Yes, they’ve bought from you.
Once.
But your goal should be to engage with your customers in the long term.
Think of customers as more than transactions. They’re people with whom you can form long-term business relationships.
You increase the ALV (average lifetime value) of each customer when you collect their emails.
One of the most potent tools for success online is to put compounding returns to work for you. If you collect customer emails, you do more than just collect a little money with each sale. You collect a potential future sale as well.
So how do you do it? Here are some ways to incentivize customers to become email newsletter subscribers as well:
Create an exclusive newsletter
Build a newsletter list for exclusive promotions, looks at new products, and unique discounts that only loyal customers can see.
Why frame it this way?
Think of it as a VIP newsletter. When customers buy from you, they’re expressing interest in your store. They’ll have a reason to sign up because they’ll feel like they’re acquiring future benefits.
And from your end, you’ll have a newsletter full of your most loyal customers. These people have not only expressed interest but have taken action with a purchase. It’s a list of pre-qualified leads.
You can build a landing page for it, or you can ask people to sign up when they make a purchase. Or, if you want to capture as many emails as possible, do both.
Create incentives for your newsletter
You can also spark interest by offering incentives for those who sign up.
Let’s take an example. Eric R. Asher is an author with a problem: his agent told him his book was “unpublishable.”
So Eric turned to self-publishing. To promote the book, he signed up to AWeber and offered a free novella to anyone who signed up for his newsletter.
Over time, he built up excitement for the product he actually wanted to sell. And by the time he was ready to sell it, he had assembled a list of pre-qualified leads.
Asher even cleverly introduced customer segmentation tags to see which genres each customer preferred. He could do this through AWeber by adding a tag to the customer whenever they clicked one of his links.
If a customer clicked on one of his steampunk stories, he had a new customer segment.
Over time, his email list didn’t only grow. It grew more precise, which made him better able to sell his books and double down on what his audience enjoyed most.
“Unpublishable” indeed.
Integrate multiple platforms
If you’re not a technical wizard, your head may be spinning with the idea of using multiple platforms. But you can link two platforms like Etsy and AWeber.
This creates a “best of both worlds” situation. You can use Etsy to get an instant influx of “foot traffic” for your business. But you can integrate AWeber to collect customer emails all the while.
That’s what Crochet by Katie did, sending out automatic emails to old customers every time she had a new product to sell.
Each new product image would come with an Etsy link, inviting customers to come right in and keep buying. It’s not too difficult to set up AWeber and Etsy integration and build brand recognition with your audience, even while borrowing notoriety and traffic from a big-time platform.
Step 5: SEO and placement strategy
Search engine optimization (SEO) is the art and science of building content strategically with an eye on performing well with query engines like Google or Bing. It also applies to platforms with their own search engines, like SEO for Etsy.
So where should you focus? That’s your choice. You’ll have to choose whether you want to optimize for high placement on platforms like Etsy or Amazon.
Alternatively, you can focus on your own website, optimize for Google, and hope for organic traffic.
Let’s briefly address the advantages and disadvantages of each:
- For platform SEO, the advantage is faster capture. If you build a steady cache of positive product reviews, you can start scoring well on Etsy and Amazon quickly. The disadvantage is that you’re subject to the whims of the platform in a highly competitive environment.
- For organic SEO, the advantage is it’s easier to own your audience. If you rank well for one keyword, you likely won’t give it up for quite a while. The disadvantage is that this works in reverse. It can be hard to compete with established bands who have already spent years and even decades working on their rankings.
So how do you compete? Start with content tools that can help you identify potential keywords, like Ahrefs or SEMrush.
Try to find high-traffic but low-competition keywords relevant to your niche. Then build content around those keywords and optimize for them on your website.
Another key: search intent. Look for the thoughts driving the keywords. Build blogs and pages designed to answer those questions.
Generally, search platforms reward you for providing answers to user queries. It can be that simple.
Step 6: Social Media Strategy
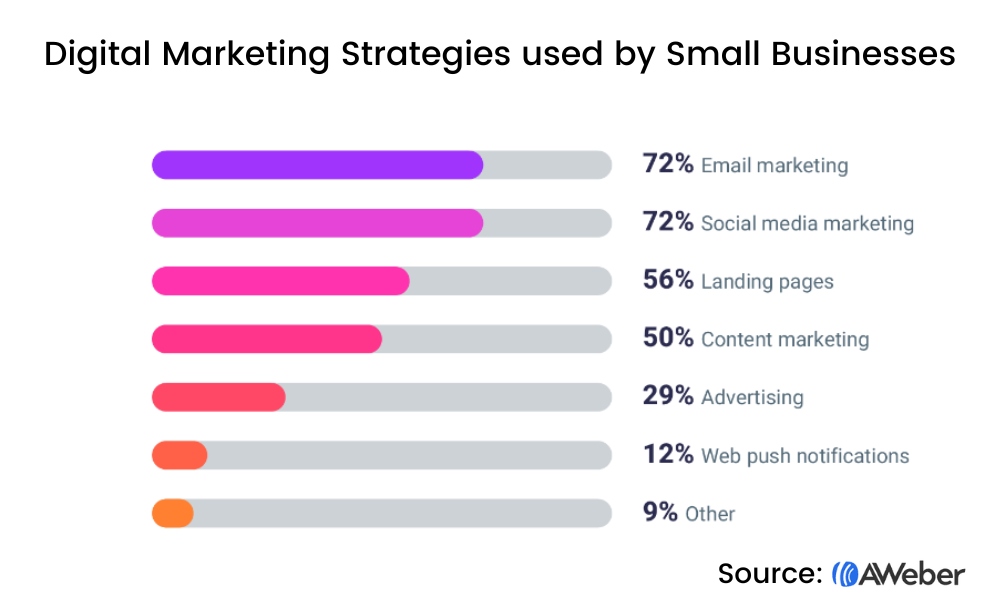
Social media can be one of the fastest ways to build a following. It’s interactive, engagement is high, and every new follower compounds your engagement.
That may be why social media marketing ranks up there with email marketing for small businesses:
Of course, it’s not as simple as signing up for Instagram. Here are a few ways you can build your following on a social media platform:
- Find your audience. This is social media, after all. You’ll have to engage with others to get anyone to notice what you’re posting. Define your niche, build a consistent brand identity with your visuals, and start leaving comments on larger accounts.
- Tell your story. Personal tidbits and “my story” angles do well on social media. Consider posting behind-the-scenes “how we made it” videos, or sharing founder stories to add personal interest to your brand.
- Create helpful visuals. Do you sell jewelry? Consider building a visual guide for shopping for an engagement ring. On social media, people want helpful tips—but they also want to digest those tips in one convenient sitting.
We’ve previously addressed some ways to build a social media presence online. There are three key tips here you’ll want to remember if you’re going to capture that social media interest and turn it into a captive newsletter audience:
- Step one: Create a landing page in your social media bios. This way, people interested in your profile have somewhere to click to discover more.
- Step two: Create a compelling lead magnet landing page for this link. A lead magnet is an easy-to-download incentive—like an ebook—encouraging people to sign up.
- Step three: Welcome social followers to your email list with a customized “welcome” page. You might even consider using specific tags to personalize your list for social media followers. This has the effect of making your brand seem more human, which makes your store that much more memorable.
Step 7: Repeat and Optimize
At this point, you should have a store going. You have your first customers. You’re starting to get a sense of what sells.
What comes next?
Start tracking what’s working. If you can repeat what works, cut away what doesn’t, and optimize your web presence based on customer feedback, you’ll be surprised at how the results can stack over time.
Here are a few ways you can identify what isn’t working for your store—and start reinvesting in what is:
- A/B testing landing pages, headlines, photos, and descriptions for best-selling items. A/B testing refers to testing two versions of a product page against each other to see which makes the most sales. You can even use A/B testing within AWeber to optimize your promotional emails.
- Doubling down on what sells will help you accelerate your growth. If your store notices that your conversion rates on downloadable products are much higher (and easier to handle) than on physical products, emphasizing those in your next promotion could help you make more sales for less work.
- Collecting customer feedback is always important. Send out emails to your newsletter subscribers. Use survey tools like Survicate to automate the process, gather the data, and make it easier to review what customers want.
From beginner to a brand-new, hopping store
Building an online store might sound overwhelming. But breaking it down into bite-sized steps makes the process easier. Take these steps in order, strategically choosing your niche, your platform, and how you want to promote the store until you’ve got a handle on things.
And in the meantime, it doesn’t hurt to start collecting emails. Every email you collect is another layer to your store’s success, allowing you to build an audience of loyal, happy customers that stacks over time.
Sign up for AWeber for free to ensure you have everything you need to build a great story—with a happy audience.