 87% off ends soon!
 How We Created Personalized Campaigns for an Email Course
By Monica Montesa October 11, 2016
Personalization is everything these days. And no, I’m not talking about monogramming your clothes or etching you and your sweetheart’s name onto a picture frame.
I’m talking about the kind of personalization as it relates to the content you create for your audience.
When you send personalized (or contextual) email content the moment a person subscribes to your list, you’re able to kick things off on a really, really good note. Not only does this allow you to provide a relevant experience to your subscriber community, it also can have a powerful impact on email engagement – in fact, one study found personalized emails receive 9 percent higher unique open rates and 41 percent higher unique click rates than those that were written for a broad audience!
While there are a number of ways to send the right content to the right people at the right time, today we’re diving deeper into creating multiple automated email campaigns from a single sign up form.
Personalized emails from the moment you say “Hello”
Here at AWeber, we’re big fans of the phrase, “eating your own dog food” (or, the more more familiar idiom, “practicing what you preach”). We believe that if we’re going to tell others to try a specific email strategy, we should be able to implement it as well.
And that’s why I wanted to share with you the approach we took in order to personalize our own email campaigns.
When the team here at AWeber set out to create our “What to Write in Your Emails” course, we had one goal: to help people figure out what to write in their emails, whether they’re just getting started or want to improve what they currently have.
The more we talked about the concept, the more we realized this audience could be broken down even further into two groups: those who are AWeber customers, and those who had never even heard of us before.
We decided it’d be beneficial to create two different targeted courses for each audience. The course content would remain the same for both, but we would have the flexibility of addressing each group in different ways to make it feel more relevant.
Initially, we set out by outlining and writing the email content for the course with one audience in mind: our customers.
As we did this, we wrote the course content knowing that our audience would be familiar with our brand and product. When we encouraged them to put what they just learned into practice, we included a call-to-action that had them log into their account and get started.
When it came time to adjust the course for those unfamiliar with AWeber, we copied over the content and made small tweaks to make it relevant to this audience. This meant including more information about our service, adding calls-to-action for them to get started with their own email service provider, or to try AWeber free for 30 days.
Using Campaigns to set up the course
To make sure that our course functioned the way we wanted it to, we used our automation platform, Campaigns.
With Campaigns, we were able to quickly and easily set up the course and targeted campaigns. Plus, we knew that it would open up additional possibilities if we decided to expand upon our course in the future.
Once the content was complete, we were ready to build our two email campaigns from our one list in AWeber:

Within Campaigns, we were able to easily set up the functionality we wanted for our course, including time delays, subscriber tags and more.
After the campaigns were set up and ready to go, it was time to create our sign up form for the course. In addition to asking for a subscriber’s name and email address, we included a field that asks if they’re an AWeber customer:
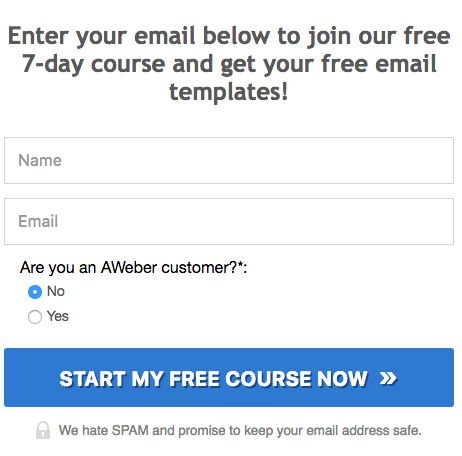
By adding this, it ensured that the right email series was triggered for the right people.
(Try this yourself! Learn how you can use tags in Campaigns to create multiple campaigns from a single list.)
And with that, our course was all set up!
Not only were we excited to see the results of sending even more relevant content to our email community, it also sparked a ton of new ideas for future personalized campaigns, too!
Once we started promoting the course, for example, we decided to create additional campaigns based on ads that drove traffic to the course. As a result, we were able to create an even more contextual experience for our subscribers!
Creating your own personalized email campaigns
While this is just one example of how you can create multiple contextual campaigns from a single sign up form, there are a number of other ways you can get started. Here are a few more ideas to get your creativity flowing:
- An automated welcome email series
- Multiple email campaigns for different incentives you offer
- Linked campaigns to move subscribers from one automated series to another
- Campaigns for conferences and events you attend that funnel into a single campaign
- An educational email course
- And more!
Is there a campaign you’d like us to write about? Tell us about it in the comments, and we might just feature it in an upcoming post!