You made a sale! That’s amazing. It’s time to sit back and congratulate yourself, right?
Well, you could do that. Or, you could use the opportunity to further engage your new customer — upsell products, ask for a review, send your newsletter, etc.
Now in AWeber ecommerce you can do just that — by redirecting every buyer after purchase. Plus, connect your domain in seconds, copy our new recurring payments template, archive used tags and more.
These feature updates are dedicated to making your life easier and streamlining your sales and marketing.
Redirect buyers to premium content or an upsell thank-you page
I’m going to make an obvious statement: someone who makes a purchase from your landing page is now a customer.
What does that mean for your sales strategy? That it’s important to take advantage of your new customer’s attention — the moment you make a sale.
Now, in AWeber, you can! After a purchase is made on your Ecommerce landing page, you can now redirect to a new page. This simple feature offers a world of opportunity to your sales journey.
Think about where you’d redirect someone after they buy from you. Your thank you page could include:
A newsletter signup form
Social share links
Suggestions on other products they might want to buy
Premium content that they just paid for
Access to a closed Facebook group
Never Gonna Give You Up by Rick Astley
Okay, you might not want to RickRoll your customer base.
But you can seriously improve their experience and increase the chance of your next sale.
Redirecting your customers after they purchase also allows you to keep their attention longer, offer more value, and simply create good brand sentiment.
Ready to get started?
How to set up a receipt redirect
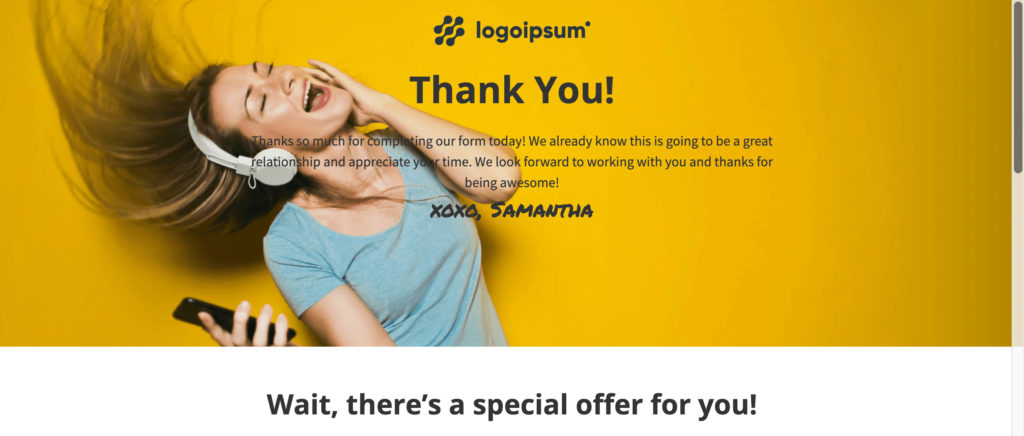
To set this up, you’ll first need to create a sales landing page with a payment button.
Next, you’ll need a thank you page. This is where you’ll send buyers after a purchase.
Note: you can actually send them to any valid URL (like your main site), but we recommend a thank you page specific to the product sold. You can set one up in minutes for free using AWeber.
To set up your thank you page, copy our Upsell Thank You landing page template (shown above) and update it with your info. You can simply thank the customer and tell them about your company or services. Or, offer additional products as an upsell opportunity.
Publish the page.
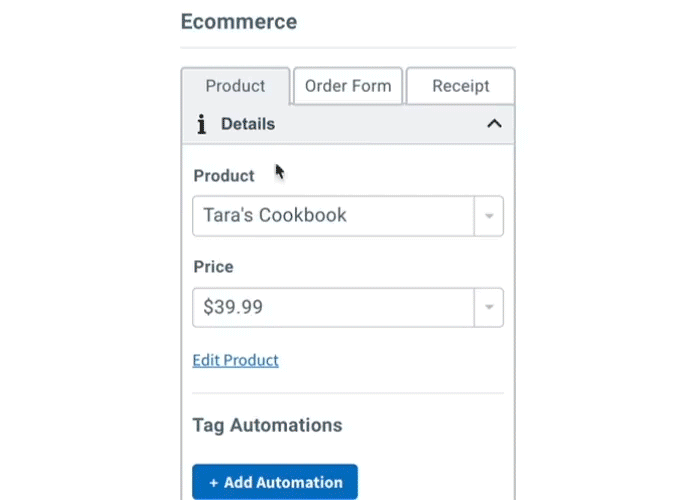
Go back to your sales page. Click on your payment button, choose “Receipt” in the sidebar, then “Redirect to Custom URL.”
Click “Save and exit,” republish your page, and your redirect will be live! Make sure to test it out.
This receipt link is an opportunity to provide value to your customers and grow your business without extra work or money. I highly recommend using it!
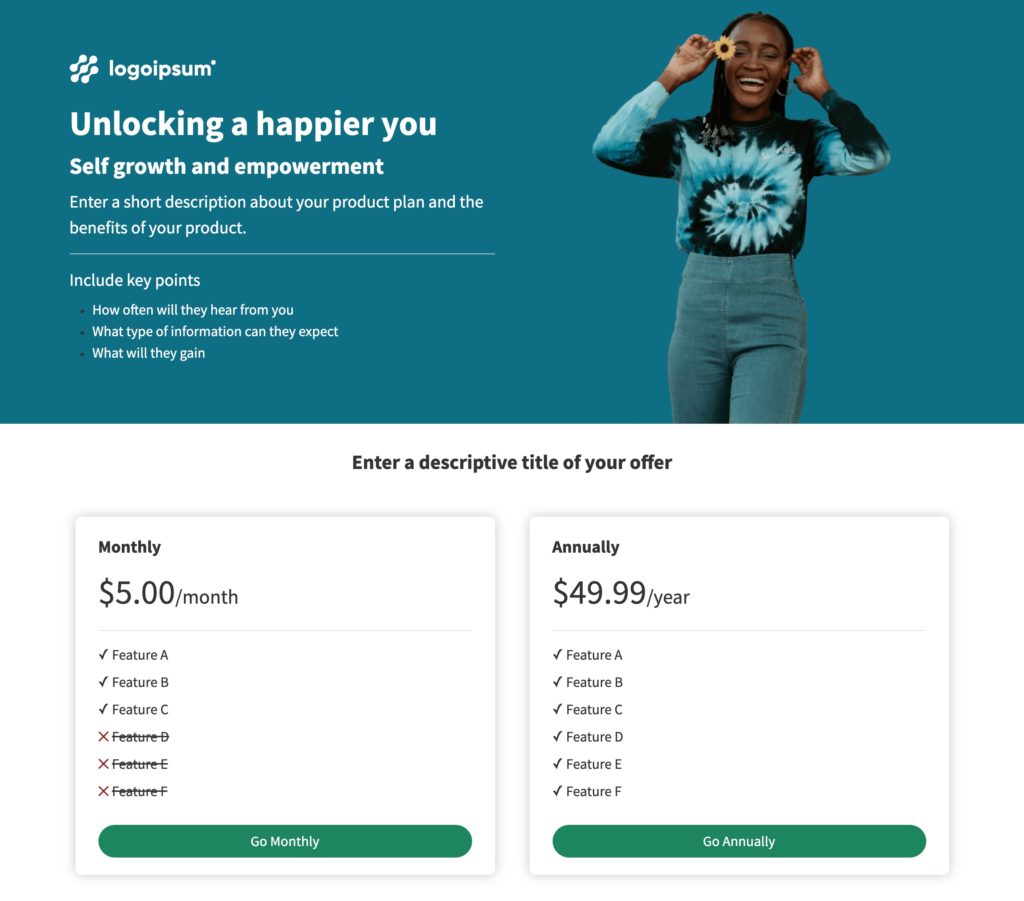
A beautiful page to sell subscriptions
Now that you can sell weekly, monthly, and yearly subscriptions in AWeber, you need a beautiful template to showcase them. After all, with a template, you can create a landing page of your own in minutes.
So we just released a recurring payments landing page template.
Add your images and messaging to this beautifully simple design to make it yours. Then fill out each subscription’s price and details. Finally, connect the payment buttons to your Stripe account (or set one up). That’s it, you’re done!
Within minutes, you can be selling subscriptions to your audience or anyone else.
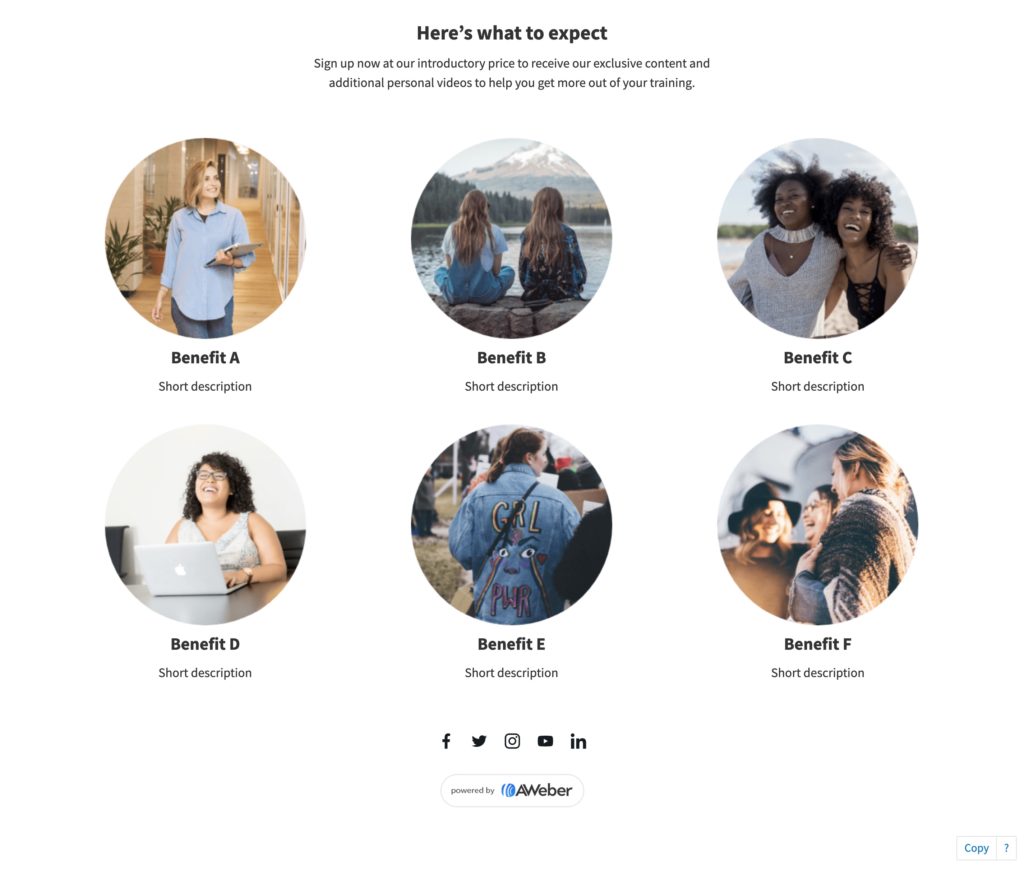
Bonus: Add 6 images and benefits at the bottom to sell the value of your subscription service once and for all.
This page can be copied immediately into your account and you can always add more elements and change all the colors and text. Like it? Try it out in your account today.
Connect your domain in seconds — no DNS needed (what’s that anyway?)
Remember when connecting your domain meant figuring out your registrar (huh?) and adding DNS records (what’s that?).
Well no more! In mere seconds and a few clicks, you can now connect your domain to your AWeber account.
Wait, why do I want to connect my domain in the first place?
Connecting your domain helps authenticate your account, which means more of your emails could be delivered. Learn more about sender authentication.
Emails sent from an @yourbusiness.com address look more professional than @gmail.com.
Your landing pages will have a URL that looks like yourbusiness.com/sales rather than youraccount.aweb.page/p/0c933230…
Note: We currently only support IONOS domains, but soon to come are Google Domains and GoDaddy.
If your domain is hosted by IONOS, all you need to do is sign into your IONOS account and click through to approve the connection.
That’s it! After 30 seconds, you’re authenticated and ready to make landing pages for your website.
Don’t know if you have IONOS? If you do, this process will “just work.” If you don’t, you can simply follow the previous process until we add your domain provider (new ones coming soon).
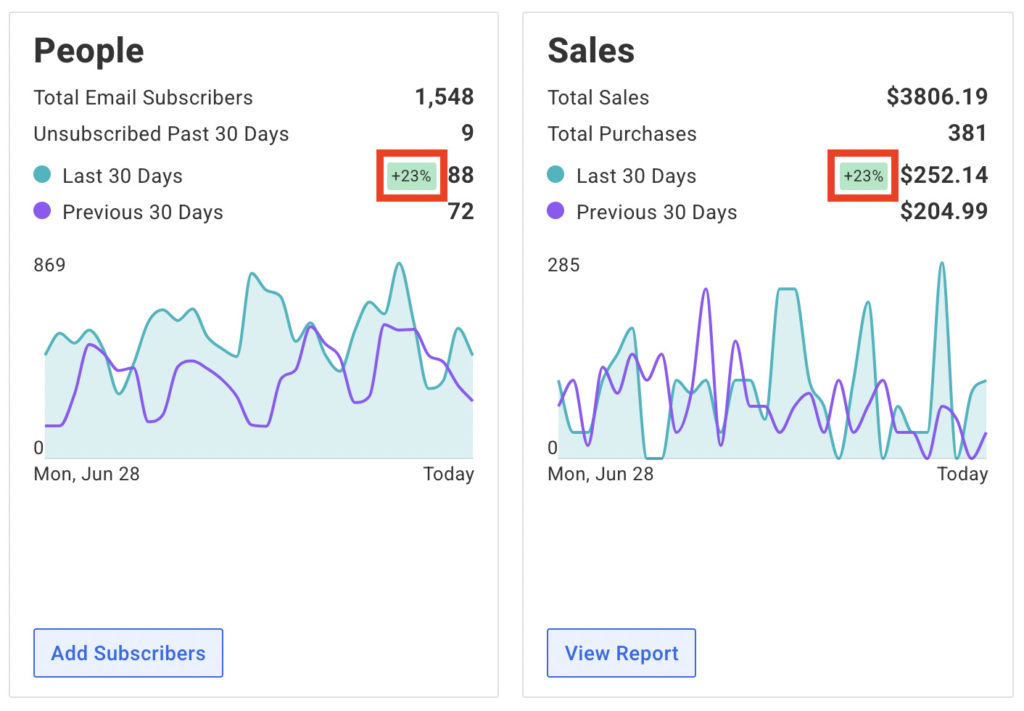
Get a sales monthly snapshot in your dashboard
Sometimes it’s nice to compare sales month-over-month, without digging deep into the data. We’ve added a small feature to help you do just that.
Your sales dashboard will now show you the % up or down relative to the previous month — in a glance.
When you get into your account, check out your stats:
Bonus: You can now archive unused tags to simplify your account
A tidy account is like a tidy kitchen: It makes creating easier.
To clean up your account, you can now archive subscriber tags you don’t use or want anymore. You’ll find the archive link next to each tag under List Options -> Tags:
Did you accidentally archive a tag you still want? No problem. Each tag can be unarchived at any time.
Feature requests? Let us know in the comments
We are forever looking for ways to improve the way you use AWeber for your business. If you have any questions, concerns, or requests for new features, please let us know in the comments below.
You made a sale! That’s amazing. It’s time to sit back and congratulate yourself, right?

Well, you could do that. Or, you could use the opportunity to further engage your new customer — upsell products, ask for a review, send your newsletter, etc.

Now in AWeber ecommerce you can do just that — by redirecting every buyer after purchase. Plus, connect your domain in seconds, copy our new recurring payments template, archive used tags and more.

These feature updates are dedicated to making your life easier and streamlining your sales and marketing.

Redirect buyers to premium content or an upsell thank-you page

I’m going to make an obvious statement: someone who makes a purchase from your landing page is now a customer.

You have a 60-70% chance of selling to an existing customer but only a 5-20% chance of selling to a new prospect.

What does that mean for your sales strategy? That it’s important to take advantage of your new customer’s attention — the moment you make a sale.

Now, in AWeber, you can! After a purchase is made on your Ecommerce landing page, you can now redirect to a new page. This simple feature offers a world of opportunity to your sales journey.

Think about where you’d redirect someone after they buy from you. Your thank you page could include:

A newsletter signup formSocial share linksSuggestions on other products they might want to buyPremium content that they just paid forAccess to a closed Facebook groupNever Gonna Give You Up by Rick Astley

Okay, you might not want to RickRoll your customer base.

But you can seriously improve their experience and increase the chance of your next sale.

Redirecting your customers after they purchase also allows you to keep their attention longer, offer more value, and simply create good brand sentiment.

Ready to get started?

How to set up a receipt redirect

To set this up, you’ll first need to create a sales landing page with a payment button.

Next, you’ll need a thank you page. This is where you’ll send buyers after a purchase.

Note: you can actually send them to any valid URL (like your main site), but we recommend a thank you page specific to the product sold. You can set one up in minutes for free using AWeber.

To set up your thank you page, copy our Upsell Thank You landing page template (shown above) and update it with your info. You can simply thank the customer and tell them about your company or services. Or, offer additional products as an upsell opportunity.

Publish the page.

Go back to your sales page. Click on your payment button, choose “Receipt” in the sidebar, then “Redirect to Custom URL.”

Click “Save and exit,” republish your page, and your redirect will be live! Make sure to test it out.

This receipt link is an opportunity to provide value to your customers and grow your business without extra work or money. I highly recommend using it!

A beautiful page to sell subscriptions

Now that you can sell weekly, monthly, and yearly subscriptions in AWeber, you need a beautiful template to showcase them. After all, with a template, you can create a landing page of your own in minutes.

So we just released a recurring payments landing page template.

Add your images and messaging to this beautifully simple design to make it yours. Then fill out each subscription’s price and details. Finally, connect the payment buttons to your Stripe account (or set one up). That’s it, you’re done!

Within minutes, you can be selling subscriptions to your audience or anyone else.

Bonus: Add 6 images and benefits at the bottom to sell the value of your subscription service once and for all.

This page can be copied immediately into your account and you can always add more elements and change all the colors and text. Like it? Try it out in your account today.

Connect your domain in seconds — no DNS needed (what’s that anyway?)

Remember when connecting your domain meant figuring out your registrar (huh?) and adding DNS records (what’s that?).

Well no more! In mere seconds and a few clicks, you can now connect your domain to your AWeber account.

Wait, why do I want to connect my domain in the first place?

Connecting your domain helps authenticate your account, which means more of your emails could be delivered. Learn more about sender authentication.Emails sent from an @yourbusiness.com address look more professional than @gmail.com.Your landing pages will have a URL that looks like yourbusiness.com/sales rather than youraccount.aweb.page/p/0c933230…

Note: We currently only support IONOS domains, but soon to come are Google Domains and GoDaddy.

Sounds great! How do I connect my domain now?

Sign into AWeber and navigate to My Account -> Domains and Addresses.Add your domain into the Add a New Domain field.If your domain is hosted by IONOS, all you need to do is sign into your IONOS account and click through to approve the connection.That’s it! After 30 seconds, you’re authenticated and ready to make landing pages for your website.

Don’t know if you have IONOS? If you do, this process will “just work.” If you don’t, you can simply follow the previous process until we add your domain provider (new ones coming soon).

Get a sales monthly snapshot in your dashboard

Sometimes it’s nice to compare sales month-over-month, without digging deep into the data. We’ve added a small feature to help you do just that.

Your sales dashboard will now show you the % up or down relative to the previous month — in a glance.

When you get into your account, check out your stats:

Bonus: You can now archive unused tags to simplify your account

A tidy account is like a tidy kitchen: It makes creating easier.

To clean up your account, you can now archive subscriber tags you don’t use or want anymore. You’ll find the archive link next to each tag under List Options -> Tags:

Did you accidentally archive a tag you still want? No problem. Each tag can be unarchived at any time.

Feature requests? Let us know in the comments

We are forever looking for ways to improve the way you use AWeber for your business. If you have any questions, concerns, or requests for new features, please let us know in the comments below.
Keep reading:Put Your Signup Form Exactly Where You Want ItDraft, Send, and Analyze. All From ChatGPT
 87% off ends soon!