87% off ends soon!
 How to Add Email Marketing to Your Bubble.io Website
By Sean Tinney October 17, 2025
Built a website with Bubble.io’s no-code platform? You’ve got the design and functionality nailed—but without email marketing, you’re missing out on your biggest revenue opportunity. Email gives you direct access to your visitors that social media never will.
While Bubble.io makes it easy to build professional websites with dynamic features, adding email marketing transforms your site from a digital brochure into an active customer acquisition machine. Here’s how to set up professional email marketing on your Bubble.io website in under 30 minutes.
Why Add Email Marketing to Bubble.io
Your Bubble.io website might look stunning with custom workflows and interactive elements, but if visitors browse once and disappear forever, you’ve built something beautiful that doesn’t generate results. Email marketing solves this by capturing visitor information and nurturing them into customers.
Email drives real business growth. When someone visits your Bubble.io website, they’re showing interest—but most won’t buy on the first visit. Email gives you permission to follow up, build trust, and guide them toward a purchase when they’re ready.
Bubble.io excels at creating visually appealing, functional websites with custom databases and interactive features—but it’s a website builder, not a marketing platform. An email marketing tool, like AWeber, fills that gap by providing the automation, list management, and campaign infrastructure that turns website visitors into paying customers.
Step-by-Step Integration Guide
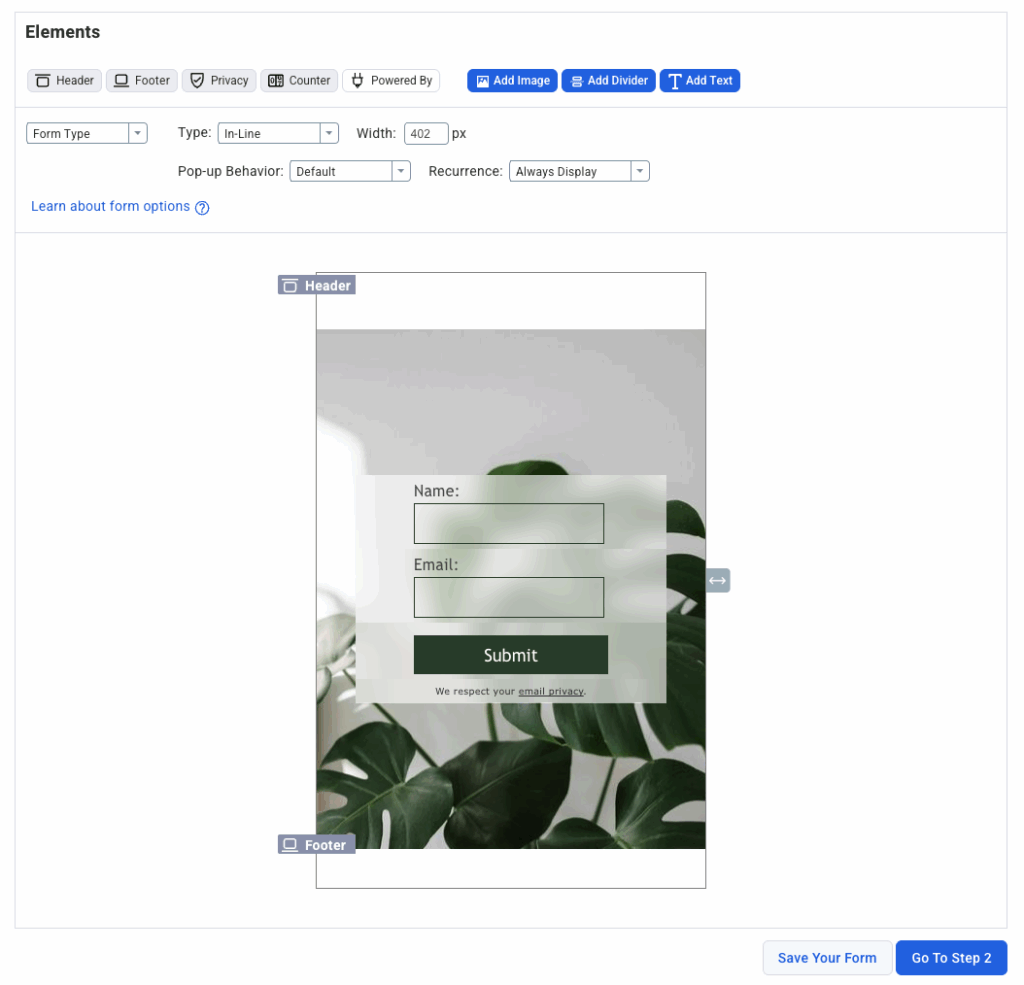
Step 1: Create Your Signup Form in AWeber
Log into your AWeber account and navigate to the signup form builder. Choose a form template that matches your website’s aesthetic—you’ll find options for everything from minimal inline forms to attention-grabbing popups.
Keep your form simple by requesting just name and email address. Every additional field you add reduces signups by approximately 11%. Your goal is reducing friction while capturing enough information to personalize future communications.
Customize your form’s colors, fonts, and button text to match your Bubble.io website’s branding. When your signup form looks like a natural part of your site rather than a third-party widget, visitors trust it more and convert at higher rates.
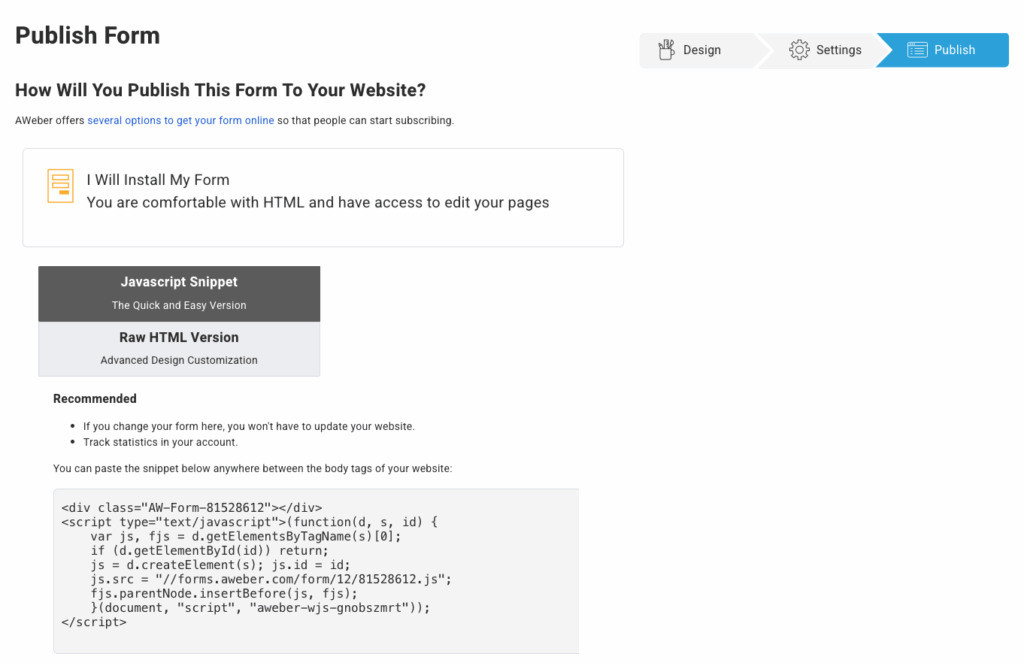
Step 2: Get Your Embed Code
Once your form design looks perfect, click the “Publish” or “Embed” button in the form builder. Select the “HTML” or “JavaScript” embed option—both work seamlessly with Bubble.io’s HTML element.
Copy the complete embed code. Make sure you grab everything from the opening tag to the closing tag. Partial code won’t display properly, and you’ll waste time troubleshooting what looks like a platform issue but is actually an incomplete copy-paste.
Our form builder automatically generates mobile-responsive code, which means your signup form will adapt perfectly to any device without additional configuration work on your end.
Step 3: Add the Form to Bubble.io
Open your Bubble.io editor and navigate to the page where you want your signup form to appear. Drag an HTML element from the element menu onto your canvas—you’ll find it in the input forms or visual elements section.
Paste your complete embed code into the HTML element’s content field. Position the HTML element exactly where you want your signup form—below your hero section, in your sidebar, above your footer, or anywhere that makes sense for your layout.
Preview your website to confirm the form displays correctly. If you notice styling issues, you can adjust the HTML element’s dimensions or use Bubble.io’s responsive settings to ensure proper display across different screen sizes.
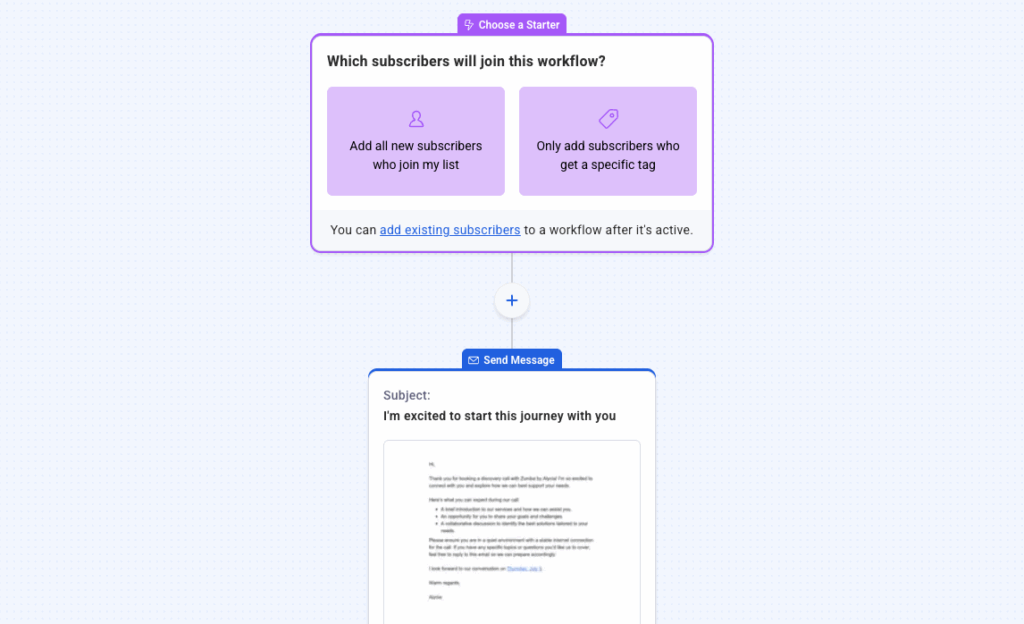
Step 4: Set Up Welcome Automation
Head back to your AWeber account and create a welcome automation sequence. Navigate to the automation builder and select “Create New Automation” or use one of our pre-built welcome sequence templates.
Your first email should arrive within minutes of signup, thanking new subscribers and delivering any promised content like a discount code, free guide, or exclusive resource. This immediate follow-up confirms they made the right decision and sets expectations about future communications.
Build out a 3-5 email welcome series over the first week that introduces your business, shares your story, and guides subscribers toward making their first purchase.
Step 5: Test Your Setup
Create a test account using your own email address to experience the complete subscriber journey. Fill out your Bubble.io signup form and verify the email arrives in your inbox within the expected timeframe.
Click through every link in your welcome emails to ensure they direct visitors back to the correct pages on your Bubble.io website. Broken links or incorrect URLs create immediate trust issues that are difficult to recover from.
Check that new subscribers appear in your AWeber list with correct information and proper tagging. If you set up any conditional logic or segmentation based on signup source, verify those automations trigger appropriately.
Troubleshooting Common Issues
Styling looks wrong? Bubble.io’s HTML element has default dimensions that might not match your form’s natural size. Adjust the HTML element’s width and height properties, or set them to “fit content” to let your form size itself appropriately.
Double opt-in not working? Check your email settings to ensure confirmation emails aren’t landing in spam folders. We recommend single opt-in for most websites to reduce friction, but if you’re using double opt-in, make sure new subscribers know to check their inbox immediately.
Subscribers not appearing in your list? Verify your form is connected to the correct AWeber list in your form settings. If you have multiple lists, it’s easy to accidentally publish a form pointing to the wrong destination.
Best Practices for Bubble.io Email Marketing
Place signup forms strategically throughout your website. Don’t limit yourself to a single footer form. Add signup opportunities on your homepage, blog posts, about page, and anywhere visitors are actively engaging with your content. Multiple touchpoints increase overall conversion rates without feeling pushy.
Offer something valuable in exchange for email addresses. Generic “join our newsletter” forms rarely convert well. Instead, offer a specific benefit—a discount code, free resource, exclusive content, or early access to new products. Give visitors a compelling reason to share their email address.
Segment subscribers based on website behavior. Bubble.io’s dynamic capabilities let you track which pages visitors view and what actions they take. Use this information to tag subscribers appropriately—someone who signs up on your pricing page has different interests than someone who joins from a blog post about beginner tips.
Send regular, valuable emails that drive traffic back to your website. Build a consistent email schedule—whether weekly, bi-weekly, or monthly—that keeps your business top of mind. Every email should provide value while including clear calls-to-action that bring subscribers back to relevant pages on your Bubble.io website.
Test everything obsessively. A/B test your signup form placement, headlines, calls-to-action, and incentives to continuously improve conversion rates. Our platform includes built-in A/B testing for up to 3 email versions, making optimization straightforward without complex external tools.
Frequently Asked Questions
What is a Bubble.io website?
Bubble.io is a no-code platform for building custom websites without writing traditional code. Unlike basic website builders that rely on templates, Bubble.io gives you complete design freedom with a visual drag-and-drop interface. You can create everything from simple business websites to complex database-driven sites with custom workflows, user accounts, and interactive features—all without touching a line of code.
Does Bubble email integration require coding knowledge?
No coding required. The integration process uses Bubble.io’s HTML element and our pre-generated embed codes, which you simply copy and paste. Both platforms are designed specifically for non-technical users who want powerful functionality without writing code.
Can I customize the signup form to match my website’s design?
Absolutely. Our form builder offers complete control over colors, fonts, button styles, and layout. You can match your Bubble.io website’s branding perfectly or create custom forms using CSS if you need advanced styling options.
Start Growing Your Bubble.io Website’s Email List
Your Bubble.io website deserves an email marketing system that matches its professional appearance. We designed our platform specifically for businesses that need powerful marketing automation without technical complexity—exactly what you need when running a no-code website.
Our drag-and-drop email builder, visual automation workflows, and AI-powered writing assistant make it simple to create professional email campaigns that drive traffic and revenue. Plus, with 24/7 support from email marketing specialists, you’re never stuck troubleshooting integration issues alone.
Ready to turn your Bubble.io website visitors into engaged email subscribers? Start your free 14-day trial with AWeber and add your first signup form today. Your future customers are waiting in their inboxes.