87% off ends soon!
 How to test emails before you send them
By Pam Neely July 12, 2022
Remember that cringe-worthy moment when Steve Harvey read the wrong name for the winner of Miss Universe?
Don’t be like Steve. Avoid mistakes in front of a large audience by testing emails before you send them.
This doesn’t take a lot of time – maybe five to 10 minutes. It will keep you from embarrassing yourself and annoying your subscribers. One bad experience can be enough to turn a subscriber away for good.
But if you do accidentally pull a Steve Harvey and mess up? It happens. Don’t let the fear of making a mistake keep you from sending your emails. You can always send an apology email.
The two most common types of email marketing mistakes
There are two types of mistakes we see in emails.
- Human errors: missing words, typos, wrong dates, broken links, or outdated info
- Display errors: differences in message appearance across email clients
Luckily, both of these types of mistakes can be avoided.
How to avoid human errors in email messages
Let’s say you send an email promoting your new product.
The open rate is amazing: More than 60% of your subscribers opened the email! More than 30% of people who opened the link clicked through to see your product!
You start celebrating . . . until the replies from your subscribers start rolling in.
“The link doesn’t work.”
“Bad link.”
“You included the wrong link.”
“I can’t find the landing page!”
“I wanted to buy it, but when I clicked, it showed an error message.”
You forgot to update your email with the new product link.
You quickly send out another email with the correct link. But by now, you’ve probably lost a large portion of subscribers who clicked through on your first email. Once the link didn’t work, they moved on, taking their potential sale with them.
We wish this was a fake scenario, but we see it happen all the time. Some weeks, we get so many emails with broken links we wonder if maybe it isn’t some kind of misguided tactic people try just to get more clicks from their emails (there are better ways to get more clicks).
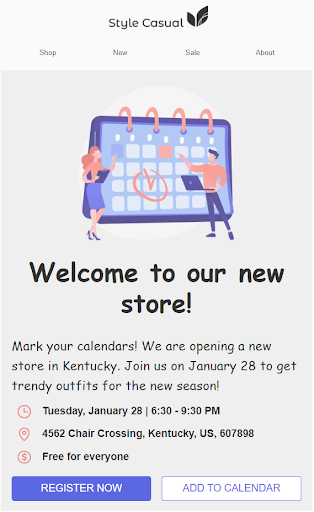
Here is an example of a broken link apology email:
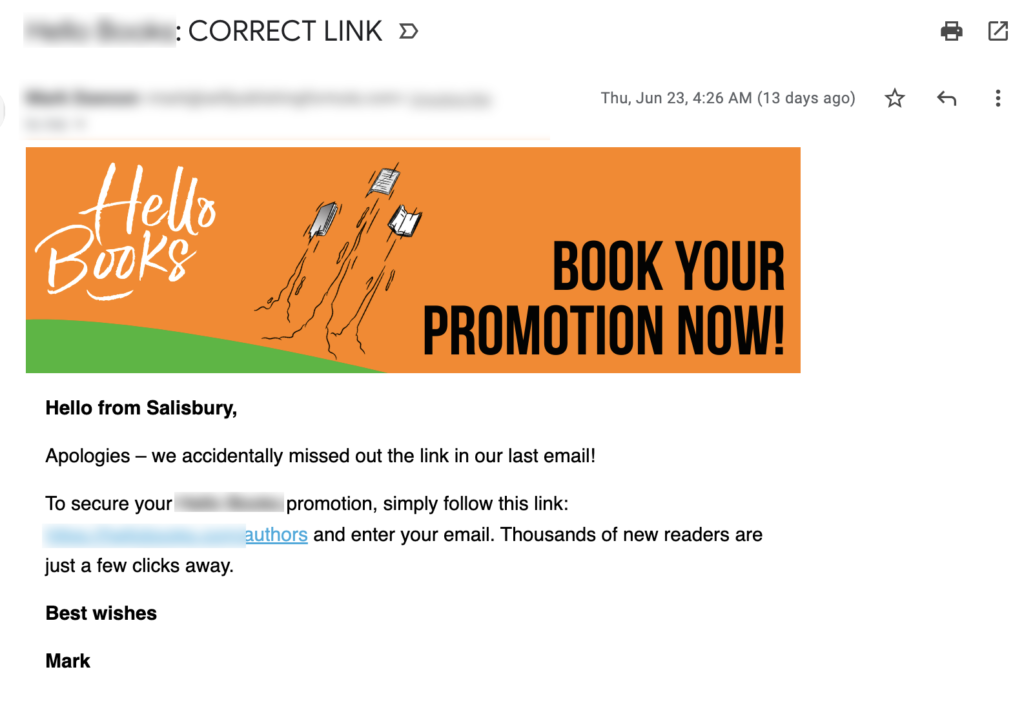
Fortunately, there is a proven way to avoid sending apology emails. It’s called a “pre-flight checklist.”
How to use an email pre-flight checklist
We have a pre-flight checklist at AWeber and we use it for every email we send. We like it so much, we’ve included an adapted pre-flight checklist below that you can use to test emails before sending.
It’s simple to use: Before you send any email, pull up this checklist and read it through. Confirm that every item on the list has been checked.
This does, obviously, add a few more steps to getting your emails out. But the payoff is huge: No more mistakes in emails. Less anxiety about sending your emails.
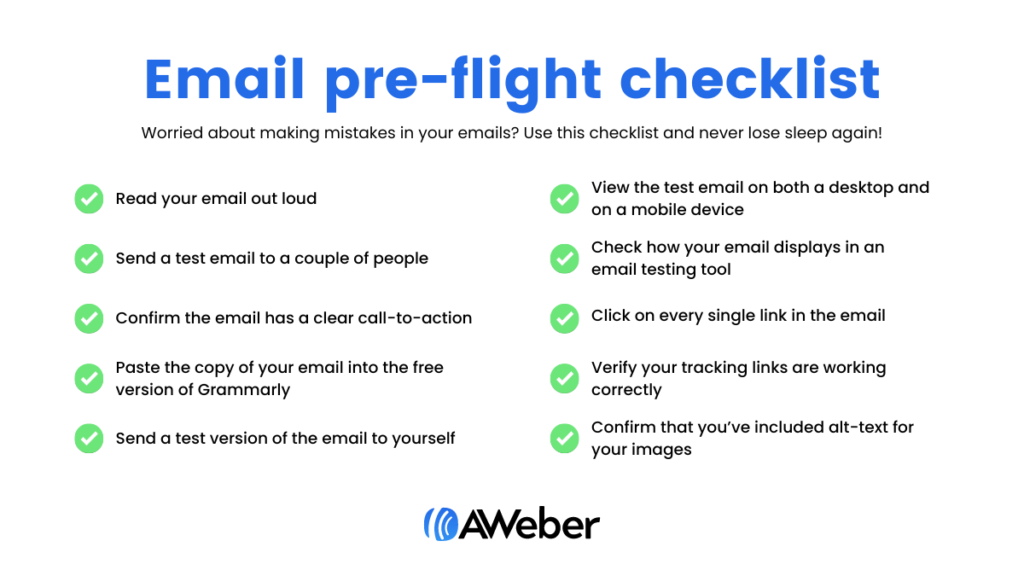
Your email pre-flight checklist
- Read your email out loud. (Or have your computer read your email out loud to you.) This will help you hear where your writing might need some fine-tuning and it will help you find typos or missing words. It can also help you check the tone and the content of your email.
- Send a test email to a couple of people you trust and who aren’t afraid to give you an honest critique. They offer a fresh pair of eyes that may catch something you didn’t.
- If it’s a marketing email, confirm the email has a clear call-to-action that the reader should take, whether that’s a purchasing page, a blog post, a registration page, etc?
- Paste the copy of your email into the free version of Grammarly to make sure there are no typos or other copy errors. Also paste the subject line and preheader in to confirm there are no errors.
- Send a test version of the email to yourself.
- View the test email on both a desktop and on a mobile device like your phone.
- If you have a large list (over 2,000 subscribers) or if your emails have a complex layout or are using advanced coding like AMP, check how your email displays in an email testing tool (see below for more information).
- Click on every single link in the email – including linked images. (Fortunately, if you don’t catch the typo in your URLs, AWeber’s automatic link checker inside our message editor will. You’ll see a red exclamation point pop up to tell you the link is broken. If the URL is valid, you’ll see a green checkmark.)
- When you click on each link, verify your tracking links are working correctly (if you’ve added tracking codes)
- Confirm that you’ve included alt-text for your images. Why? Alternative text appears in the place of an image. Many email services will disable images in messages, and some users turn them off all together. Alt-text allows the user to understand what was meant to be there. It’s also helpful for any of your subscribers that may be visually impaired.
BONUS: If you have time, get your email set up, then go do something else for an hour or so. When you come back to it with fresh eyes, you’ll notice things you might have otherwise missed.
How to avoid display errors in email messages
In a perfect world, all email services would display emails the same way. There would be no default setting to block images, or funky changes to the color of your text. You wouldn’t have to worry about your email content getting clipped, and you wouldn’t have to test emails before sending.
But email services don’t display all emails the same way. ☹️
In email marketing lingo, how email messages display in different email clients is called “rendering.” So you may have heard these display errors referred to as “rendering errors” in the past.
Whatever the problem, we must make sure our emails display correctly for all of our subscribers — regardless of where they choose to host their inbox.
The best way to do so? By testing emails before sending them to subscribers.
Test your emails before sending
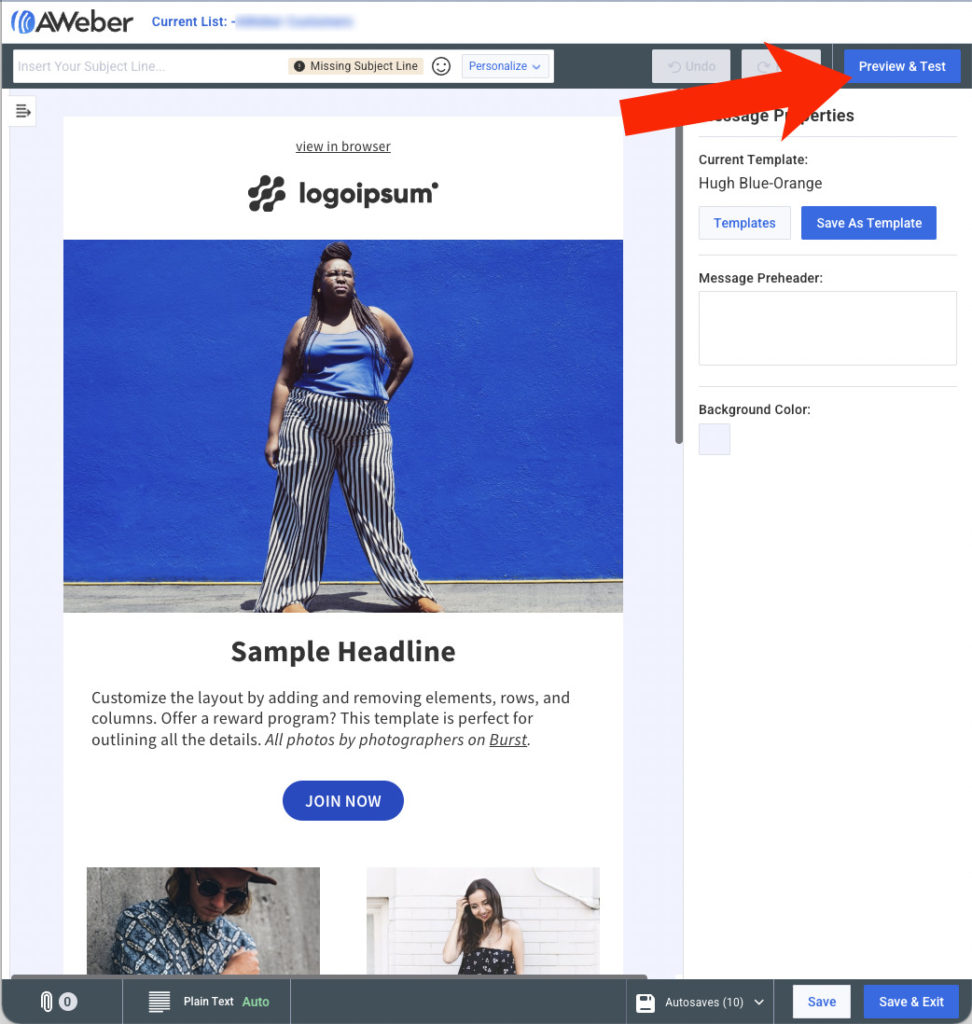
Previewing your emails before sending them to your list allows you to view your email from your subscriber’s perspective: in an inbox similar to theirs from your desktop or mobile device.
This is easy to do in AWeber. To send a test message to yourself (or to anyone else), just click the Preview & Test” button in the upper right-hand corner when you’re in the Message Editor.
Then enter your email address (or the email address of whomever you want to send the test email to) in the field on the next page:
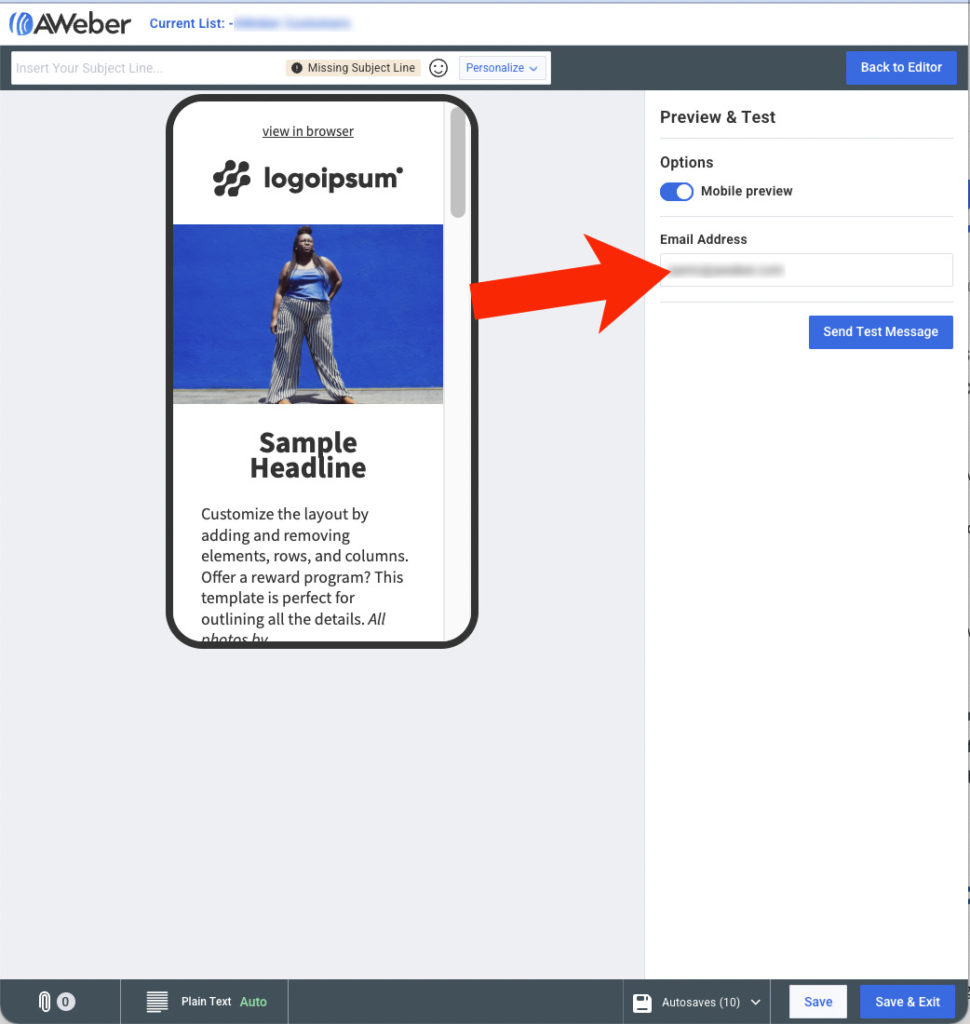
Note that in the view above, we’ve turned the “Mobile preview” on, so we’re viewing an approximation of how the email would look in a mobile device.
Just taking that extra step is a great start. It’s more than many senders do. However, simply sending a test version of an email to yourself and viewing it in your favorite email account isn’t enough if you’ve got a large list, or if you want to be sure your emails render correctly.
Why’s that? Because if you only view your email in one email client before sending, you don’t know how that email will display for subscribers that open it in a different email client.
Sometimes emails can render very differently in different email clients. For example, say you’re using fancy fonts in your emails. Here’s how an email with an unusual font might display in Gmail:
and here’s how that same email would render in Outlook:

The fonts are different, but the buttons also look very different. And you can guess what a disabled button can do to click-thru rates…
Rendering differences can also cause images to get cut-off, misplaced text or worse.
Fortunately, there are two email testing methods to manage this:
1. Create different email addresses and send emails to yourself.
Managing a variety of email addresses may not sound appealing, but it’s a good (and free!) way to check how your subscribers will see your emails in their inbox.
When using this method to test emails before sending, it’s important to view your emails in a variety of email clients, and with a variety of devices. So you might want to set up accounts on a few email clients like Gmail, Yahoo, and Outlook. Then view the emails sent to each of those email clients via different devices, like a desktop, a phone, and an iPad or similar device. Then try viewing your emails using dark mode.
This works — and it’s free — but you can probably see how this can get pretty time-consuming. It could easily take longer to check your email than it did to write it and lay it out!
2. Use a third-party tool to test and preview your emails across different clients.
While a great start, the first testing method — creating email addresses for the top email clients — can be inaccurate if you send a lot of email.
So you may want to try a paid email testing service. With an email testing tool, you can see at a glance how your email will render across numerous email clients and devices all at once.
At AWeber, we use Litmus to test our emails. In the screenshot below, you can see how Litmus let you see emails on multiple clients, via multiple devices, with multiple settings, in minutes.
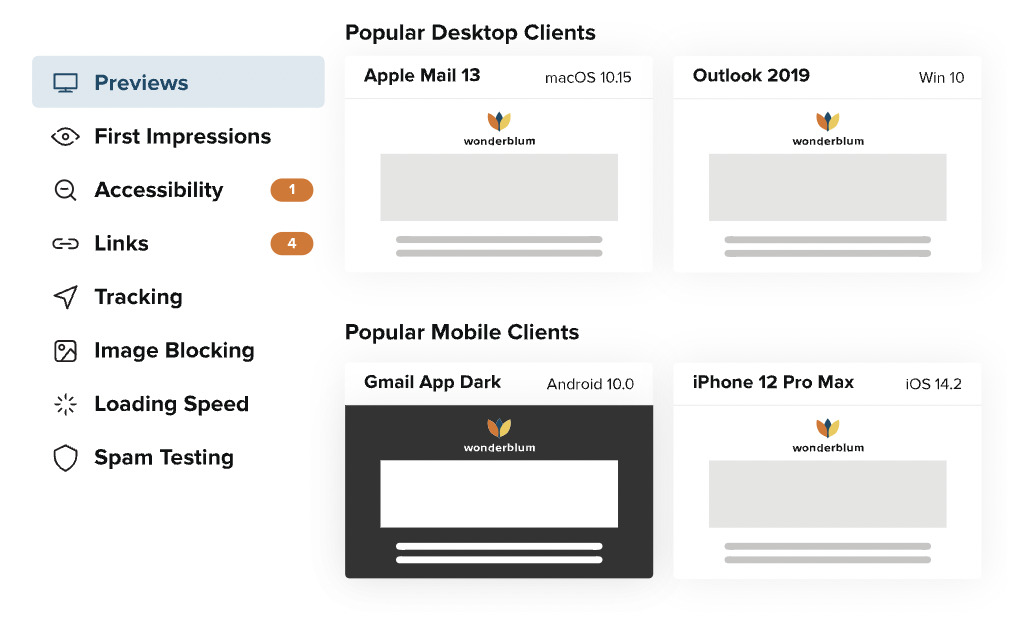
Although Litmus is a good fit for us, you might like another email testing tool like Email on Acid or Previewmyemail.
A pre-flight checklist and a workable email testing plan are all you need to test emails before sending
So that’s how to never have to send another apology email again. Just:
- Use a pre-flight checklist
- Use an email testing tool (or make up your own)
Your pre-flight checklist doesn’t have to be fancy. Choose which steps you feel are essential, then let go of the rest. Some email senders even print out their checklist and keep it by their work station. Any time they have an email to send, they just breeze through their list, then click “Send.”
Your email testing tool also doesn’t have to be overcomplicated. If you’ve got a small list and you’re short on time, checking your emails in one of two email clients on your phone and on your laptop might be fine. It depends on how many resources you have, and on how perfect you want your emails to be.
Here’s a secret pro trick that can help you avoid email mistakes, too: Use a pre-designed template. Templates have been rigorously checked to make sure they’ll render well in every major email client. So long as you don’t fiddle with the email template too much, you can trust your emails will look good if you use a template. And if you do want to adjust a template (and you’re an AWeber customer) we offer an affordable template customization service.
Now it’s your turn: What’s your perfect email pre-flight checklist? Have you been using a checklist up until now? Would you spend money on an email testing tool, or is the “free version” we explained good enough for now? How will you test emails before sending after reading this?
Let us know in the comments.