Understand Email Tagging: The First Step to Segmenting Your Audience
By Kristin MacLaughlin November 30, 2020
It’s no secret that sending personalized emails is the best way to make sure the right content gets delivered to the people who want it most. But to understand personalization, we first need to understand tags.
But what are tags and how do you use them? Getting started with tags can seem a bit overwhelming at first, especially if you have not used them before or have grown your lists without tags.
Thankfully, there are several easy ways to update your list to utilize tags that will help you build deeper connections with your audience and ultimately grow your business.
What is an email tag?
A tag is a label composed of a few words to help organize and classify your contacts. Think of tags as virtual sticky notes about a specific subscriber that tells you more about their interests, likes, and behaviors.
Email marketing tags can be added automatically when a person takes action on your website, or interacts with your email, sign up form, or landing page. You can apply specific tags (or labels) to each of your subscribers to send more targeted broadcasts and trigger automated campaigns.
How to organize email lists
There are numerous ways you can tag the subscribers on your email list. You can tag based on how they are connected to you and their behaviors and interests.
For example, Blog readers can be tagged by the type of content links clicked and subscription date. Customers can be tagged by the products they purchased, coupons used, and their location (city or zip code). Prospects can be tagged by the content they download, website pages visited, subscription date, webinar or event attended. Donors can be tagged by their donation tier.
What is the difference between an email list and an email tag?
An email list is a group of people who have opted-in for your emails because they have an interest in your content or products. You can set up one list and tag your contacts based on what you know about them. Or you can set up multiple email lists based on different sign up forms or landing pages.
The downside of having multiple lists is that you can have the same contact on different lists. For example, someone is on your product list because they brought a product, but they are also on a lead magnet list because they downloaded a piece of free content. If you send the same content to different lists, people on more than one list may receive duplicate contact.
But using one large list without tags can be risky, too. Without categorizing your subscribers appropriately you run the risk of sending irrelevant email content to some of your subscribers.
To avoid these mistakes, you can combine multiple lists into one list. Then apply tags to identify the people on your list based on interests, behaviors, and how they joined your list.
Remember: Tags let you send the right message, to the right person, at the right time (not multiple times) — so you can reap the rewards of sending a targeted email that will grow your business.
How to segment using tags?
Email segmentation divides people on your email list into different parts or segments based on their actions or behaviors.
While there are many ways to segment your subscribers in AWeber, one of the easiest and most flexible ways to segment subscribers is with tags. You can search for subscribers who have a single tag, multiple tags, or any variety of tags. You can even search for subscribers who don’t have a specific tag.
To segment, apply a search filter to find a set of subscribers that have something in common. You can apply a segment to multiple lists or one list. Watch the video below for step-by-step instructions on a segment using tags.
Creating more targeted segments (or groups) of subscribers can help you achieve higher email open and click rates, better email deliverability, and more sales.
How to personalize your emails using tags and segments
Tagging lets you send highly personalized email content and set up segments that let you deliver the right message to the right people at the right time. In fact, segmenting your list with personalized content can increase your conversion rate by 760%. But how do you use this information to drive your email campaigns?
Let’s say you are a non-profit. You could identify who donated last year and who did not. Then, send an email to each group. You can create two different email campaigns: one for those that sent you a donation and the other that did not. The first email in the series warms up your audience based on prior behavior before asking them for a donation in the second email.
While segmenting your emails by two different types of donors may seem fairly basic, it can profoundly affect your donation totals. Let’s look at how this campaign could look:
Campaign #1: Sent to subscribers who donated last year
Email #1: Thank you for donating last year. I wanted to share how we used your money to change lives.
Email #2: Can you be a lifesaver again this year? Please consider donating.
Campaign #2: Sent to subscribers who did not donate, but downloaded a guide
Email #1: I wanted to share a new video on how we are changing lives with a new technology that is now available for free.
Email #2: Did you enjoy the video? Can you help us save more lives with a tax-deductible donation?
The example above is for a non-profit, but the same principles apply if you sell products, services, or create content.
5 ways to use tagging in your email campaigns
There are numerous ways to tag subscribers within AWeber, but five of the most popular methods are outlined below.
1-Categorize your subscribers into groups
You can search for anyone that meets specific criteria and tag them all at once. For example, tag subscribers who haven’t opened an email from you in the past 30 days, anyone who clicked on a particular link, or those who joined from a certain web form or landing page.
If you have multiple sign up forms, you can apply different tags to subscribers when they fill out separate forms. This way, you’ll know all the content they are interested in to send them the right message.
Related: How to tag an AWeber sign up form
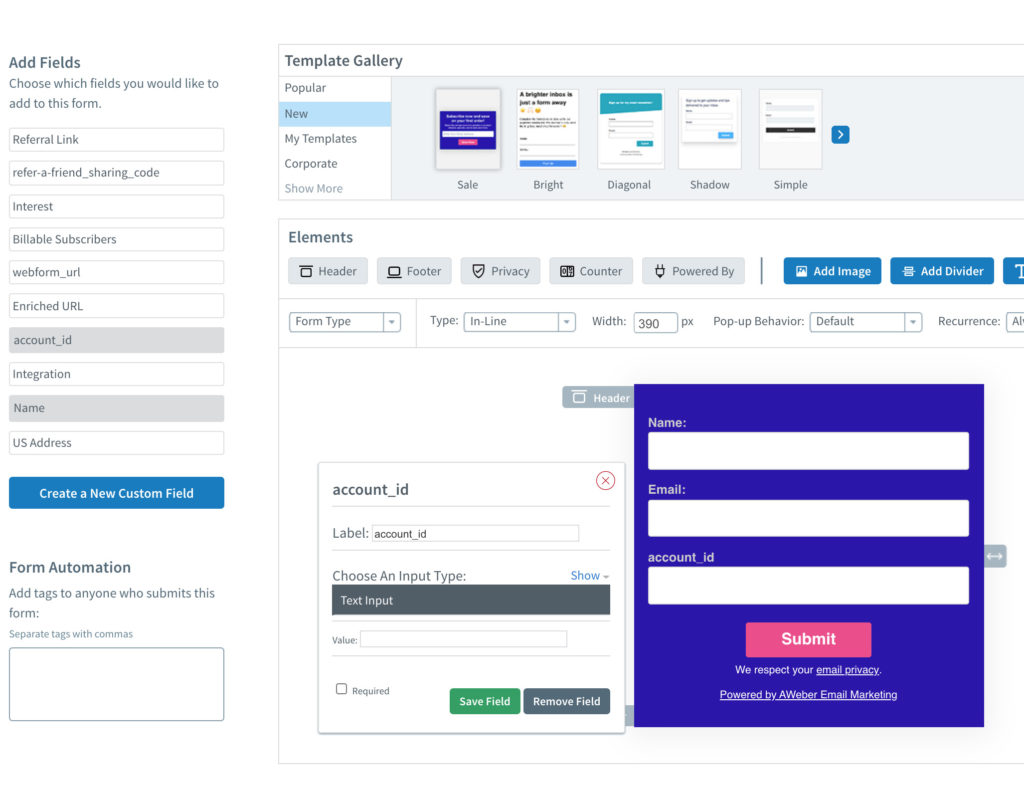
If you add custom fields to your sign up forms or landing pages, you can collect additional information about your contacts’ interests and preferences. For each custom choice, a tag is added to that person so you can send more targeted and personalized emails.

Related: How to tag a custom field in an AWeber sign up form
2-Trigger personalized campaign automations
Tags also integrate with AWeber’s automation platform, Campaigns, so you can trigger an automated sequence of emails to send to a specific segment.
Let’s say you’re a food blogger who’s planning a webinar on the vegan diet. When you create your sign up form for your webinar, make sure everyone who signs up to your list receives the tag “vegan-webinar.” By tagging subscribers this way, you’ll know who joined your list and what content they’re likely interested in.
When the tag “vegan-webinar” is added to your list, you can set up an automated welcome series to trigger to let them know they are registered and what to expect. Since you know these subscribers are also interested in vegan-related content, you can send targeted information about other vegan resources, like a few free recipes to keep them engaged in your welcome email series.
3-Send personalized content in a broadcast email
After the webinar is over, you can send a one-time broadcast email to tagged subscribers with more content. Simply search for subscribers with the tag “vegan-webinar” in Manage Subscribers, create a new segment, and send.

Share an invite to download another bonus incentive, such as a vegan meal plan or promo code to purchase a recipe book. Add as many emails to your campaign as you need to maintain regular communication. Your subscribers will remain engaged with content they’re interested in, and you can nurture them to become loyal customers.
4-Create multiple campaigns in a single list
With Campaigns, you are not bound by a single automation series per list, and you can apply tags at any point during a sequence. Create multiple campaigns in one list, and trigger them with specific tags through AWeber web forms or landing pages.
When subscribers are tagged with a new tag, they’ll receive the appropriate campaign, even if they’re already subscribed to that list. Below, we’ll walk through when this might be helpful and how to set up tags to trigger your campaigns.
Here’s an example of when this concept might apply: delivering multiple lead magnets but keeping subscribers on one list.
Let’s say you’re collecting subscribers on your food blog using a lead magnet, the Paleo Quickstart Guide.
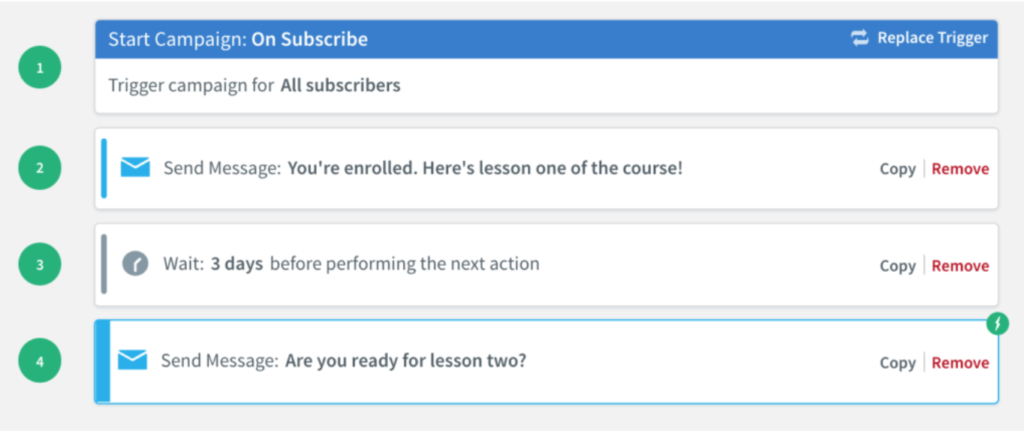
These subscribers would be added to your list and entered into a Welcome Campaign. As you can see below, this campaign will be triggered by a tag ‘paleo’ associated with the web form you used.


Let’s say every six months you also run a 30-day Paleo Challenge. This is a lead generation effort to get people on your main list through other means. It’s built for new leads, but you want existing subscribers to be able to opt in, too.
Let’s do it with Campaigns!
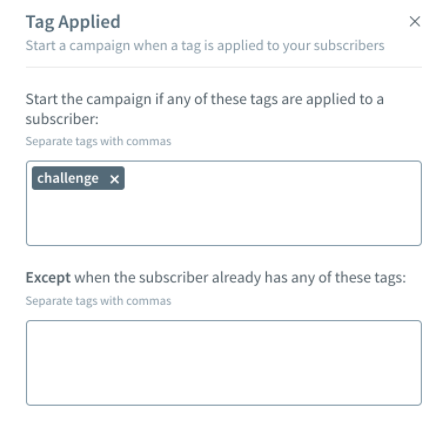
Create a second campaign titled “30-day Paleo Challenge.” Trigger this campaign on a specific tag called “challenge.”

Load up the emails you plan to send during the challenge.
Now, we simply need to attribute this tag to any signup form or landing page that promotes the challenge.
Direct your current subscribers to the landing page or form, and if they enter their email address, they’ll immediately receive the same series as prospects.
Have a new lead magnet? Running an email course? This method will apply. You no longer need to spin up a new list every time you need to deliver a new series.
5-Tag on click automation
You’ve written a compelling message, formatted it perfectly, and crafted a high-converting email. You’ve loaded it into your automated campaign, and some leads and sales start rolling in.
But more probably could.
Making sure your subscribers who open (or didn’t open) your emails receive the perfect follow-up is key to keeping your prospects moving towards a purchase.
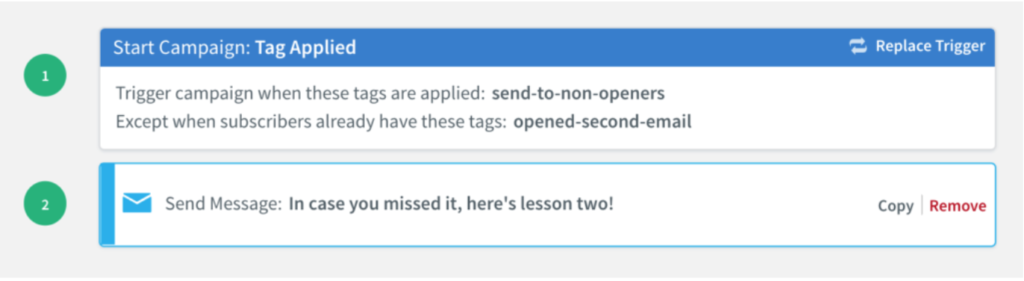
Tag subscribers who open your messages in Campaigns, opening up new opportunities to segment subscribers, trigger automated re-engagement emails, and build the perfect marketing funnel.
Tag your subscribers “opened-second-email” if they open the second message.
But if they don’t open your emails. You can set a wait time of three days and then apply a new tag: “send-to-non-openers.”
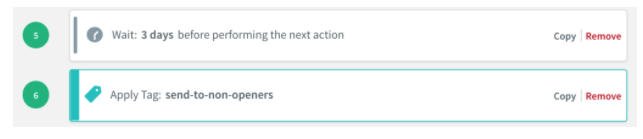
Create a campaign that is triggered when a subscriber has the tag “send-to-non-openers” but does not have the tag “opened-second-email.”
Delivering a new campaign to subscribers after that three day wait time if they didn’t open the second message.
You can also create a variant of this to send a custom email to subscribers who did open the second message, simply by setting your trigger criteria to include the tag applied after the wait and the tag applied for opening the second email.
Keep engaged subscribers happy by delivering more useful and contextual content, and re-engage non-openers with the perfect follow-up message at the right time.
How to make an email tag with AWeber
There are multiple ways to apply tags to your subscribers. Below are some of the most common options.
Bulk tagging: Update on Import
If you have a number of subscribers, you want to tag all at once — you can tag the group of subscribers all at once with just a few clicks.
Using bulk tags, you can apply labels to your subscribers to group them by interests or behavior.
Go to the Subscriber tab and select “Add Subscribers.” On the “Map Subscriber Info” step, you can select if you would like to add only new subscribers to your list or update new and existing subscribers.
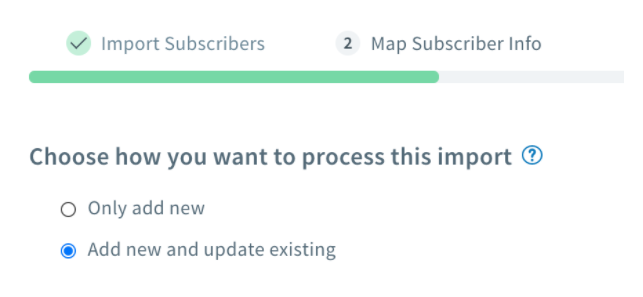
Selecting “Add new and update existing” allows you to edit your existing subscribers’ data in bulk. You can use this function to add new tags or update custom fields and subscribers’ names.
You can also bulk tag your subscribers and add them to an automated email campaign. The video below shows you the easy step-by-step process.
Apply tags in a sign up form
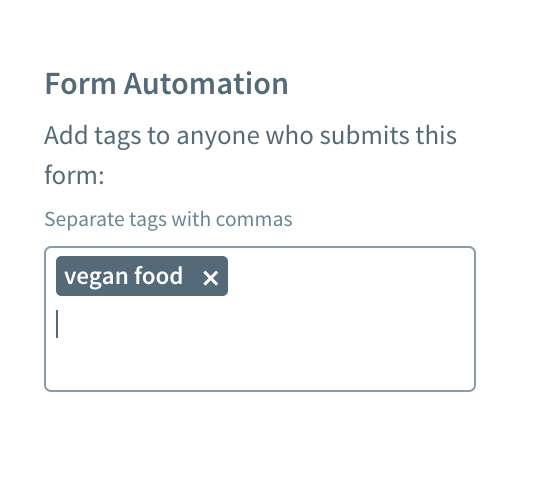
When building a sign up form, create and add a tag to ensure it’s applied to subscribers who opted-in to your list. You can add any tags to the form in the “Form Automation” box on the form builder’s left-hand side.
You can also build your form and apply tags to subscribers based on information they select in a custom field.
To send specific subscribers an email, create a new segment in Manage Subscribers based on the tag. Create your broadcast email and send it to your new subscriber segment.
Apply tags in landing pages
AWeber’s landing pages are a single web page that lets you promote your newsletter, promote a product or service, or offer a downloadable resource.
Easily apply tags to subscribers who sign up through the form on your landing page to track where they signed up, trigger specific campaigns, and help segment your list to send targeted broadcast messages.
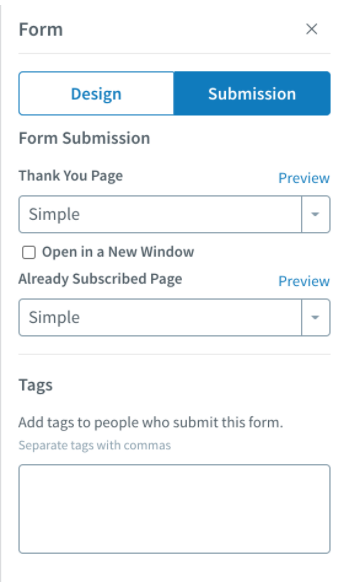
When you are on the form in the landing page builder, select the Submission tab to add any tags.
Apply tags through an integration
Want to know what your customer purchased so you can send them similar products or discount coupons? Providers like Shopify, WooCommerce, PayPal, Clickbank, ThriveCart, 3dcart, and DirectPay allow you to easily add your customers into your AWeber account and tag them, so you know who purchased from you.
AWeber’s WooCommerce and Shopify integrations even allow you to apply unique tags for each product your subscribers purchase or left in their abandoned cart.
More pro tips on tagging
We only scratched the surface of all the cool things you can do with tags and segmentation.
Jose M Goncalves
12/3/2020 8:52 amGood morning,
I have signed up to the AWeber email marketing and have been doing it myself. I do not have the knowledge to set it up the most proficient way so, do you have consultants / designers that can take my account and set it up properly?
I have several thousand email addresses that my customers gave us over the years when they purchased something from us. I would run specials but the catch was that they would have to fill out an ID card and give us permission to send emails.
Please let me know.
Thank you
Sean Tinney
12/3/2020 2:21 pmHello Jose – thank you for signing up with AWeber. We have several options to help you set up your account. If you were previously sending emails through another email service provider, we can migrate your lists, email templates, landing pages, sign up forms, etc with our free expert migration services – https://www.aweber.com/migration.htm. If you need some assistance setting up your AWeber account, our customer services team is always here to help you 24/7. You can contact them by phone, live chat or email – https://www.aweber.com/contact-us.htm. We also have several AWeber Certified Experts that can assist you with your marketing needs – https://www.aweber.com/certified-experts.htm.